


Painting your camper cabinets can have a huge impact on the look and feel of your camper remodel. We originally wrote this post several years ago, after the paint on our first camper was about two years old. Amazingly, three years later, the paint is still in the exact same shape. We’ve since taken on another camper project and seen countless other renovations. We’ve learned quite a few things in our five years since starting our renovation journey. Since the tips in this post are still really relevant–especially for newbie renovators–we thought we’d update it and pass on a few things we’ve learned along the way. Enjoy! 😀
 One of the first things we did on our Coleman remodel was paint the cabinets. It really made a huge difference in the feel of the camper. Once that project was finished, I could really see my remodel plans starting to take shape. You can find our original tutorial here. We get asked a lot questions about this modification. I mean A LOT. 😉 I get it! It is a scary step to take, and once you do it, there is no turning back. There really is no need to worry. It’s an easy (but time consuming–for sure!) project that will yield great results. Here are a few of your most frequently asked questions answered.
PAINTING CAMPER CABINETS: YOUR QUESTIONS ANSWERED

Question: My pop up camper cabinets are not real wood. They seem to be covered in some sort of wood grain printed plastic paper. Can I still paint them?
Answer: YES! Most pop up camper cabinets are not real wood. Every pop up camper I have ever seen has those paper covered MDF or fiberboard cabinets. Ours were no exception. These cabinets are cheap to make and very light, which makes them ideal for manufacturers. The downside for owners is that they are ugly and don’t seem to wear very well. Our Coleman cabinets had some areas where the paper was peeling off, and the only fix was to make repairs and paint them. The key to successfully painting these cabinets was all in the prep work. I’ve detailed our painting process here, but I cannot stress enough the importance of good prep work. Use a good primer! It is what will ensure that your paint job lasts a long time. Don’t skimp! 😉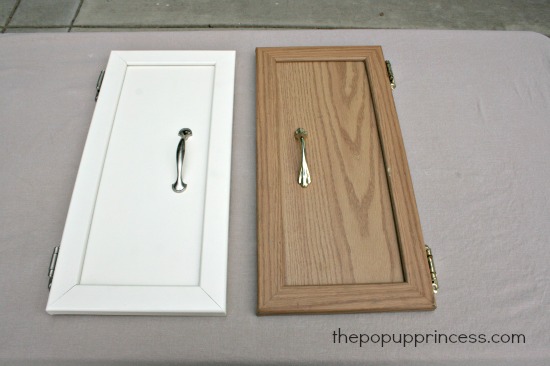
Question: The paper coating on my cabinets is peeling in some places. Can I still paint them? How do you fix this?
Answer: YES! You can absolutely still paint your cabinets if some of the paper coating is missing or peeling. We did. If I had sections where the paper was peeling, I simply used a little wood glue to re-adhere to paper and covered any cracks with some wood filler. Then I sanded the wood filler smooth. We also used the wood filler–sanded smooth, of course–in the small areas where the paper coating was missing completely. Once we painted, you couldn’t even tell where we’d patched.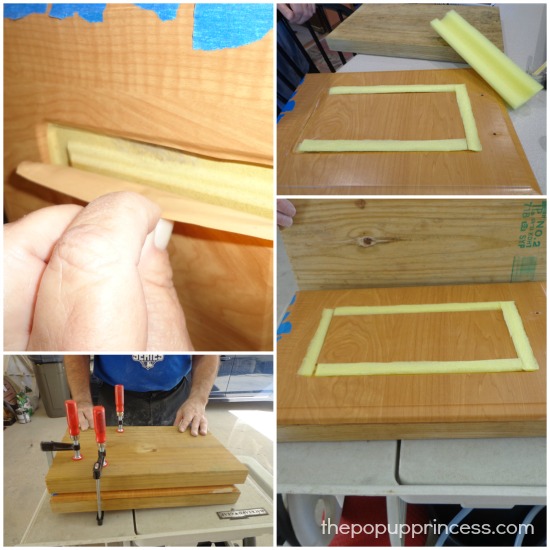
I featured Monte & Marie’s makeover on the blog, and they had the exact same issue. Monte used wood glue to re-adhere the paper to the cabinets, but in the recessed areas, he really got creative. He used sections of pool noodle cut to size to hold everything in place while it dried.
Question: What if large sections of the paper coating are missing? How can I still paint the cabinets?
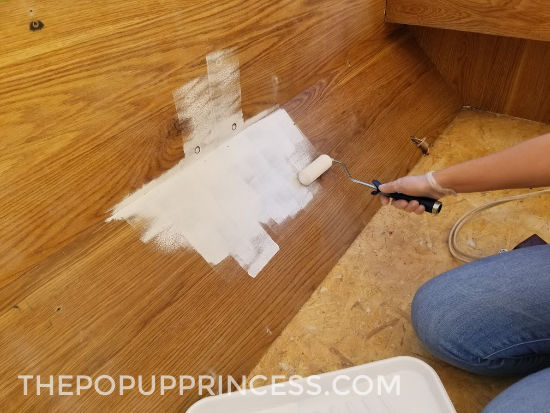
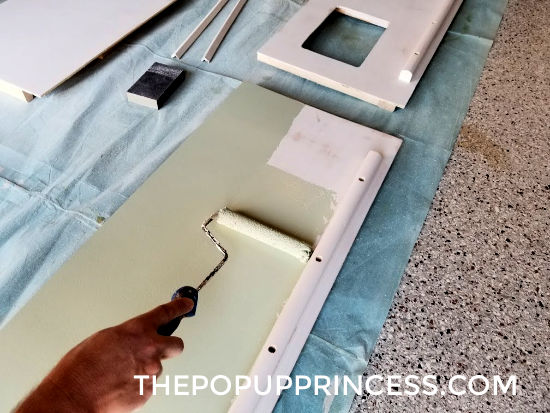
 If you are missing large sections of the paper coating on your cabinets, or if you just want to remove the coating and paint the MDF underneath, that’s totally doable! Check out Katie Graham’s makeover to see how she solved this problem. Katie used a hair dryer (a heat gun will also work great) to soften the adhesive on the paper. Then she painstakingly removed the coating. Remember that the cabinets are MDF, so you’ll have to make sure you sand lightly and remove any residue or remaining adhesive. Use a good primer (we like Zinsser) and sand lightly between coats. You’ll probably need more than one coat of primer on the raw MDF. Then you can paint your cabinets with a good quality paint.
 Question: Do I have to sand (or prime) my cabinets before I paint?
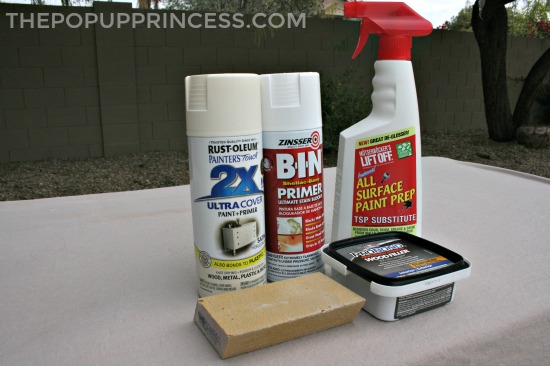
Answer: Well, no… you don’t have to do anything… but I highly recommend it. 🙂 Remember that your cabinets are probably not made of real wood. They’ve got that plastic paper coating on them–and that means paint won’t want to adhere well to them without some help. Primer–especially the Zinsser brands we like–is specially formulated to stick to tough-to-cover surfaces, and it really does make a difference. Sanding your cabinets lightly gives the primer some “tooth” to hold on to, and it will give you a very durable finish when it is all done. Your cabinets are going to get some abuse, so sanding and priming will ensure all your hard work lasts past the first trip out. We’ve heard from a lot of readers, and many who skimped on the prep work have to frequently touch up chips and flaking paint.
Question: What kind of paint should I use?
 Question: What kind of paint should I use?
Answer: We used an oil-based paint on the Coleman camper cabinets. You can read more about that here. You don’t have to use an oil-based paint, but you will get a far more durable finish. Oil-based paints are often used on trim work, because they can withstand abuse. Latex paint makes for easy clean-up, but it is less durable in the long run. With our Rockwood camper, we used alkyd paint from Dunn Edwards. I really like alkyd paint because it is a hybrid. It has the durability of an oil-based paint, but it cleans up with water. It really is the best of both worlds. If you want to see how we painted our Rockwood cabinets, check out our post here.
Question: Can I use latex paint and primer in one?
 Question: Can I use latex paint and primer in one?
Answer: You can. I’m not a fan of latex paint for cabinetry, and it wouldn’t be my first choice. I have featured quite a few makeovers where readers have used latex paint with no problems to report, though. I would still suggest preparing and priming your cabinets in the same way you would if you were using any other paint. In our experience, you’ll just get better results if you use a separate primer. It might be a little more time consuming, but we’ve found that a little extra prep work often makes all the difference in a good paint job.

Question: Can I use chalk paint?
Answer: Chalk paint sounds so easy, right? It comes in amazing colors, and you don’t even have to sand or prime first! How awesome is that? Felicia used chalk paint in her makeover, which you can find here, and it looks awesome! There is a catch, though. I’ve used chalk paint on a few projects around my house, and while the application and prep work are easy, it does require some finish work. Chalk paint is porous and requires a top coat. Most people finish their chalk paint projects with wax, but you can also finish with a polyurethane. If you skip this step, you’ll have a hard time sealing out the dirt.
Felicia sold her camper not long ago, and I was so excited to hear from the new owners. They love their new camper–how could they not? 🙂 However, they did tell me that they will likely have to repaint and add a top coat to the cabinets in the future because that chalk paint is just so porous. So, yes, you can use chalk paint and it will look beautiful if you do it right, but it isn’t quite as easy as it sounds. There is some additional work involved.

Question: Can I paint the plastic trim?
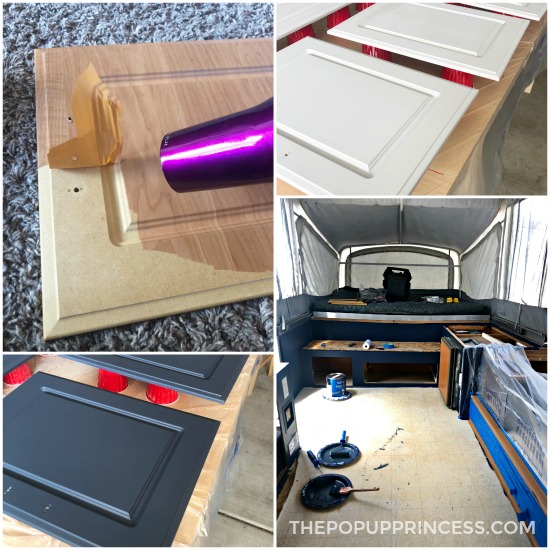
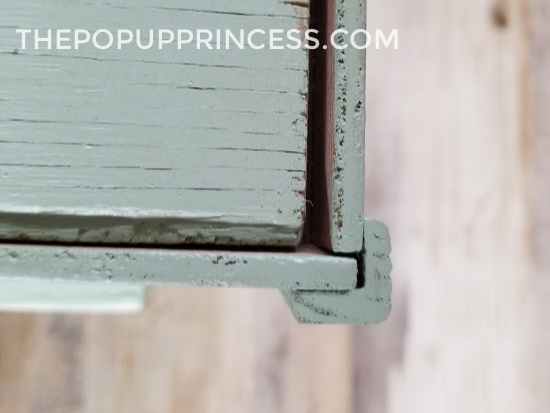
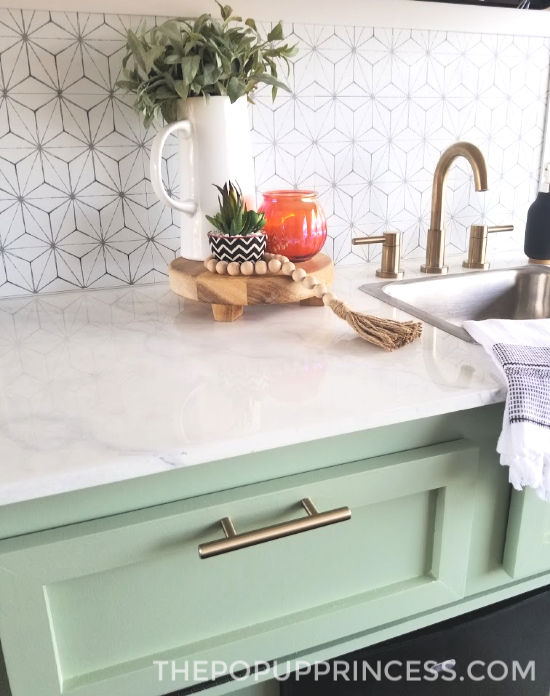
Answer: In our camper, it really depended on the trim. We had two types of plastic trim. The first type of trim was the L-trim you see in the above picture. It was basically the corner trim that held two sides of a cabinet together. This trim was made of a hard, inflexible plastic. It held the paint really well, and in five years, we only have the few chips that you can see in the above picture. Since white replacement trim was hard to come by, painting was our best option. We just touch it up every so often.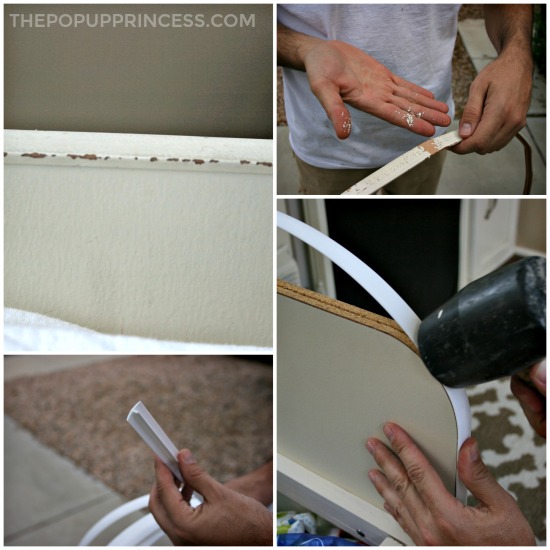 The second type of plastic trim we had in our camper was flexible t-molding. This is the trim you’ll find around your countertops and rounded cabinet edges–like the dinette. This trim did not hold paint well, as you can see in the pictures. It looked great for the first few months, but after our first trip out, it started to chip. The chipping got so bad that we eventually replaced it with white t-molding we purchased off Amazon. You can read all about that in our original painting post here.
 In our Rockwood camper, we rebuilt the cabinets from scratch. Because we didn’t have replacement trim for the corners, we used a very small corner molding to cover our corners. If you don’t have success with painting your plastic L-trim or F-trim, replacing it with a small corner molding is also an option. It holds paint really well. Just make sure you prep and prime it properly, and it will blend right into your cabinetry. You can see more on how we rebuilt our cabinets for the Rockwood here.
Question: We want to change out the hardware on our cabinet doors, what did you use? The standard drawer pulls at stores don’t seem to fit.
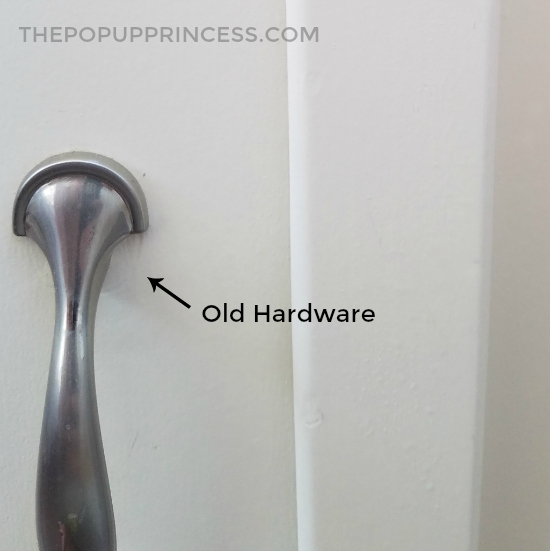
Answer: We used some pretty brushed nickel pulls that we found at Lowes. They weren’t the same size as our original drawer pulls, so the holes didn’t quite match up. We just put some wood filler in the old holes and drilled new ones. Once we painted the drawer fronts and installed the new pulls, you could hardly tell. There is a very faint outline from the old pulls (see above) on a few of the doors, but it isn’t really noticeable, especially with the new pulls installed.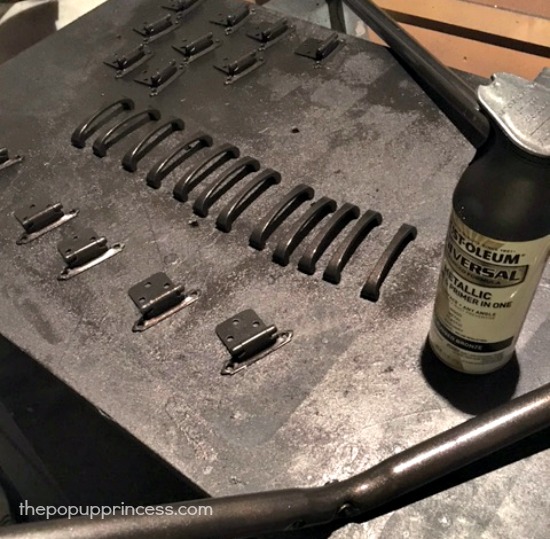
If you want to avoid that issue, you can always paint the original hardware. I’ve featured makeovers from several readers that have done just that, and it looks amazing. Check out Tiffany’s camper here for a great example of how a simple coat of spray paint can transform your cabinet hardware. As with your cabinetry, you’ll want to make sure you prep and prime your hardware, too. We painted the hinges on our Rockwood, and before we broke out the spray paint, we used a Scotch Brite pad and some acetone to scrub them down. Then we used a metal etching spray primer to coat the hinges. Once the primer was dry, we gave them two good coats of gold spray paint. Make sure you let the spray paint cure for several days–we gave them a week–before you install and use the hardware. It will ensure that your finish is durable and doesn’t chip.
Question: I really want to paint my cabinets white, but I have kids. Do white cabinets show all the dirt, and how well do they held up to abuse?
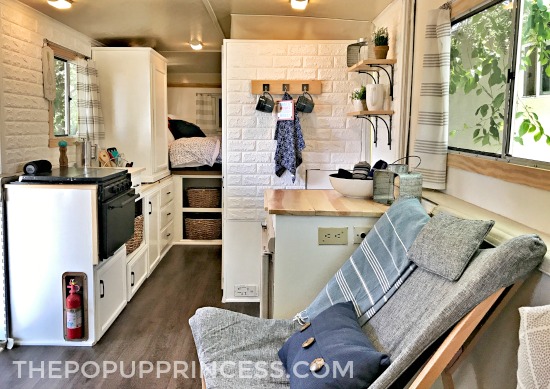
Answer: I really love our white cabinets. I’ve got some dark cabinetry at home, and I feel like it shows the dirt far more than our light colored camper cabinets. If the paint chips at all, it is much more noticeable on a dark cabinet. Yes, we have kids, and yes, they have abused our camper a bit. We have traveled over 10,000 miles in this little PUP. We have accidentally packed our dirty dutch oven next to a white cabinet door. I find dirty feet propped up on the camper walls often, 😛 but our cabinets don’t seem to show much of that dirt.
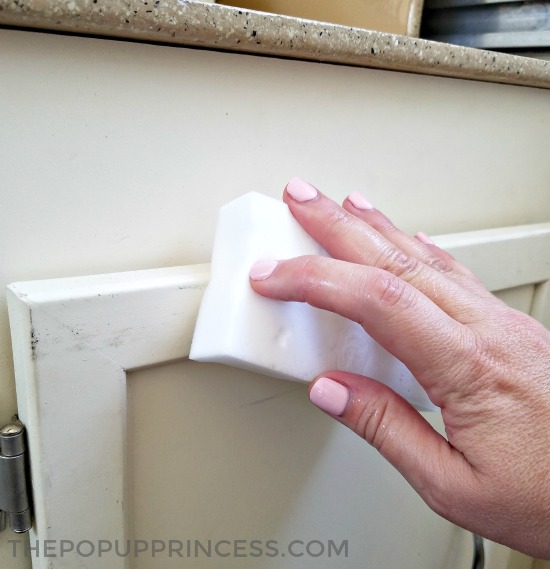
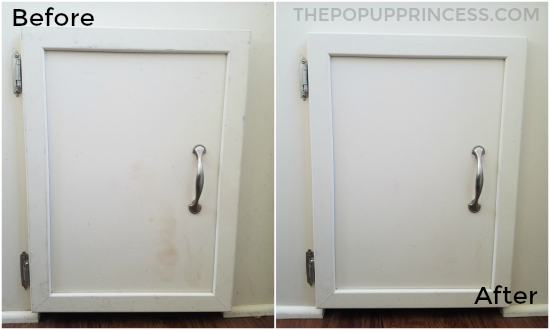
We do have to do an occasional wipe-down with a Magic Eraser to remove smudges, but I feel like we would have done that regardless of the color. Once a year, we do our annual spring cleaning, and I really give the cabinets a good scrub down. You can see a before and after picture I snapped during spring cleaning. There was a year’s worth of grime in the camper, but it cleaned up so easily. I’m very pleased with how well our cabinets look three years later. I would not hesitate to paint my cabinets white again.
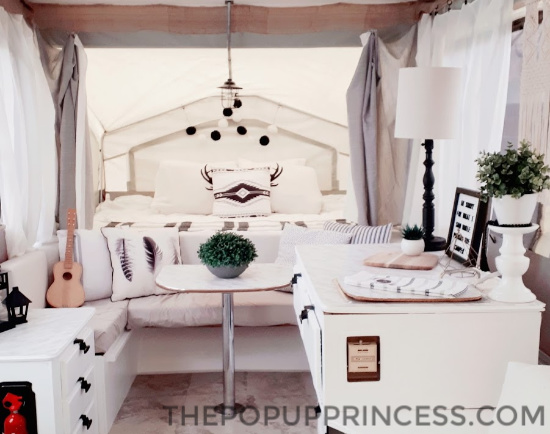 And I know there are quite a few readers who feel the same. I’ve featured a lot of pop up camper remodels that have white cabinets. It really opens up the already small camper and makes it feel so much larger. Need some inspiration? Check out these reader features with white cabinets.
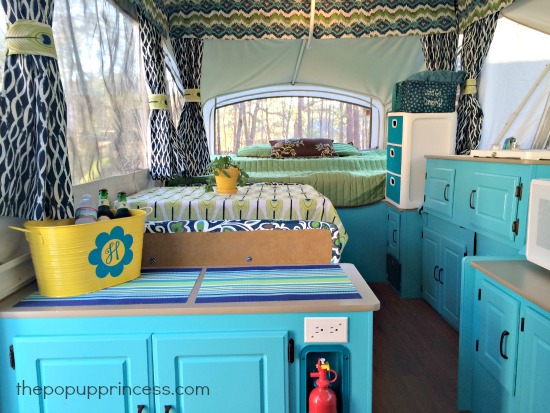 Everyone is different, though, so if you feel like white is a risky color for your family, there are so many other great colors to choose from. Check out this post we wrote on colorful camper cabinet makeovers. You’ll find some awesome inspiration!
Question: Now that it has been a few years since you painted your cabinets, how are they holding up?
Answer: Beautifully! I snapped a picture during spring cleaning to give you an idea of just how great they look after three years. Yes, Mr. TypeTwoFun gave me a whole lot of grief for the bowl of willow balls, but it was totally worth it. 😉 After five whole years of camping–two years after this photo was taken–they look exactly the same. The cabinets don’t look a whole lot different than they did when we first painted them.
 Now, the jury is still out on the Rockwood cabinets. We’ll have to wait and see how they hold up in a few years, but so far so good. I’m really pleased with the alkyd paint we selected, and we don’t anticipate having any issues with durability.
 I’m not going to lie to you. Painting the cabinets was a lot of work, but I feel like it made such an impact in the remodel, that it was totally worth it. Because we didn’t skimp on prep work or painting, our hard work wasn’t in vain. I would do it all over again in an instant. If you are on the fence about painting your cabinetry, don’t be scared. I can assure you that if you do it right, it will look amazing.
I think that answers most of the questions I get asked on a regular basis. If you didn’t see your question answered here, feel free to post it in the comments section below. And keep those reader makeovers coming. I love seeing how creative y’all are!
Happy Camping!

This is great! You mentioned the option of painting hardware, but didn’t say if it holds up. I’m super curious about that!
One of the other things i am always leery about with the makeovers i see here is the stick down flooring. With the extreme temperatures campers are exposed to, i worry about the adhesives failing in a few years. This is the main reason we went with vinyl flooring on a roll. But i’d be curious how the peel/stick flooring is holding up 5 years later!
Happy trails!
As far as painting Hardware, Rust-Oleum makes some really durable paint in a quart size cans that you can spray on with paint sprayer or brush on by hand. I use Rust-Oleum hammered effect at a nursing home. It has held up extremely well. It does take at least a couple of days to cure before becomes really durable
I want the answer to this as well!
I am just finishing up our cabinets and hardware. I chose an oil based paint and primer in one from Lowe’s and it’s working beautifully. I have done two coats so far and it looks great. There should be only touch ups left when I’m done. I did chose to spray paint the hardware, but I’m wishing I had filled in the holes and started over as I found some beautiful pulls. Loving your blog as a guide! It has been so helpful as we just bought a 2003 Coleman Niagara in January. We’ve taken it out twice and we are starting to get the hang of it!
I want to paint so badly but the slide makes it impossible to reach everything. Has anyone painted their Bayside?
We have a Niagara. I just finished painting the cabinets. I have left the spots by the slide “as is” and it isn’t even noticeable. Everything else looks so bright and nice that you don’t notice those two small areas. One day, it might bother me, but not now at all. If it does, I have read on the comments here that you can use a tiny roller to get in the two tight areas.
I’m in the process of painting my Bayside right now! I’m planning to paint the one side that I can get to, which is the long bench side. We aren’t planning to pull out the cabinet with the fridge, so I’ll have to just update the molding there and I’ll paint the inside piece that’s facing the dinning set.
I just left the part inside the slide alone and honestly you can’t even tell
I’ve spray painted pulls and doorknobs in our house-the paint just doesn’t hold up to something that you touch frequently. Maybe in a camper it is different, but I don’t know. If you’ve got the hardware off and you’re painting anyway, I’d just buy new. Chances are you might have to in the long run. I’d rather do that when everything is torn apart rather than go back and redo it.
I do have a couple of painting questions. I have a similar era Coleman. I want to paint the walls, is there any special prep work for that? And, as I’m sure is the same in yours, there is this big mechanism for raising and lowering the kitchen, did you paint that and how?
I used Glidden Gripper on the walls to prime them, Jessica. Then I used plain latex paint to give them some color. I did not paint the swing galley bar.
I’m not planning on taking my cabinets out when we remodel our Viking pop up, only removing doors & hardware, so I won’t be spray-painting. I have found Zinsser primer & Behr oil-based paint but am wondering if I’ll need to buy a whole gallon. I saw on one post they only used about a fourth of their gallon. I know it is cheaper that way, but don’t think I’ll have need for that much leftover paint.
Hello, I’m in LOVE with your blog! We’ve had a pop up camper that my parents bought for us to use and for a while we were sharing it with a couple other people (scheduled weekends etc). They recently gave us ownership of the camper and I started planning all the renovations I wanted to do. My problem though is I store the pup at my uncle’s house and it is not easily accessed when its not in use so I’m limited to actually completing the remodel while we are camping. I was wondering if you had any advise for painting the cabinets while at camp? I figure the flooring will be easy enough to do but to paint the cabinets while we are using the trailer might be a bit difficult. Any suggestions would be appreciated please!
Hmmm… that might be difficult, Serena. I mentioned your situation to Mr. TypeTwoFun, and he remarked that he would be very angry if he pulled our PUP out to a campground and set up camp next to someone who was renovating their camper. Most everyone goes out to camp to get away from the bustle of daily life. The smell of paint or constant noise of a camper remodel can be very off-putting. You’ll have to be very respectful of the campers around you, and you will have to check with the forest service or campground hosts/rangers to find out if this is even allowed. Additionally, there are probably rules against rinsing paint out in campground sinks or spigots, and you definitely should not dispose of paint rinse water on the ground. Is there any possibility that your uncle would let you paint the cabinets at his place? That seems like a far better option. 🙂
Its not a campground we camp in (actually middle of nowhere without any people for miles around us) and its usually with my uncle and extended family who are all eager to help. There are no sinks or facilities where we camp so rinsing things out is into buckets which are hauled out of the woods for disposal later. I’m more concerned with the time frames of things as our trips are usually 2 days and between priming and painting dry times is there any advice on how to keep the cabinets from ‘sticking’ once they’re dry during the curing stages? When we close up the camper there isn’t a lot of air flow to speed the curing process so I’m not sure which paint to attempt? Oil vs latex vs alkyd? Wondering if you or Mr.TypeTwoFun have any experience with preventing the cupboards from sealing shut while in the camper or if its pretty much best to leave the cupboards off and reinstall them on the next trip?
Painting then at my uncles isn’t a problem for him but he lives 2 hours away from us so its hard for us to get up to his place for more than a day to do any work on the popup. Its going to be a challenge but I’m hoping to just get a few little things done each trip after the cabinets are done. More of a facelift than a complete reno. And we live in BC Canada so the rain keeps us limited (we have to weatherproof our canvas while at camp too…..that’s going to be interesting as well nut we’ve got that one covered for now!)
We bought a used jayco popup. The kitchen sink doesnt work (we prefer to use an outside sink anyway) the stove is missing and doesnt have a place for a fridge. (We have a not so mini fridge that we use) the ac unit doesnt work either, so we use a portable unit that we vent out one of the windows. We are starting a remodel of this camper this week. I was telling hubby my ideas. One of the things i would lile to do is lose the sink and cut a cabinet to allow the fridge to stay in the camper (we currently have to remove it to close the camper) since the fridge will be inclosed in a cabinet do i need to have a vent somehow in that cabinet?
What type of fridge is it, Tammy? If it runs on propane, you’ll need to vent it to the outside. If it is an aftermarket electric fridge, I’m not entirely sure. You might want to ask that question on the Pop Up Portal, as someone there could likely give you an experienced answer. 🙂
Hi Larissa! We are huge fans of your website. We recently purchased a 2-yr old Flagstaff Highwall pup, and we want to repaint all that nasty fake wood. Just came across this ACE All-in-one furniture paint product, which claims to preempt the need to prime or sand any surfaces. Sounds too good to be true – would love to get your opinion on this: http://www.acehardware.com/product/index.jsp?productId=127749346
I have never used that type of paint, Sam, so I can’t comment, but you want to keep in mind that most kitchen and bathroom cabinets are solid wood. Pop up camper cabinets are usually laminated MDF or something similar. It is a little tougher to get paint to stick on those surfaces long term. I would never forgo the prep work—no matter how daunting it is. Good prep work is the key to a great finish that lasts. 🙂
The All-In-One paint is a flat finish, that will most likely be very hard to clean. I’m a retailer that sells a chalk paint line and although I’ve painted lots of vintage furniture with it; turning a few into bathroom vanities, I will use an oil base in my camper. With all the moving it will do, the closeness of everything, and dirt from the great outdoors, I’ll stick with non-chalk paint for this project. I usually have to do 2-3 coats of paint and then a topcoat….painting with oil paint I’ll only need two good coats, most likely not a third and that sounds R E A L good to me.
Im so inspired by these “pup”makeovers . Just purchased an 86 Rockwood . Inside is perfect just dated . Just so impressed by everyone’s ideas and accomplishments . A little overwhelmed as to what color scheme to go with as I like them all !! Looking forward to getting started on mine .
I love all the pictures! We just bought a 2008 Forest River Flagstaff pup. I will follow the great ideas for the cabinets but I’m confused on what to do for the counter tops. What did you use? I’ve been looking at the sand stone paint but I want white cabinets and a darker top but the sand stone is either tan or gray.
Thanks!
We used Rustoleum’s Countertop Transformations kit. You can read all about it here. I absolutely love how they turned out.
My canvas has a couple rips on it, I’m trying to find a good patch kit, which ones do you recommend?
I’ve heard good things about Tear Mender, Jen. Most people I have spoke with just find a Sunbrella fabric that matches their tenting and use the Tear Mender to adhere it. Make sure you waterproof the new patch, too. 🙂
Ok. I have a disaster on my hands and I don’t even know how to fix it! I used liquid sander on my cabinets to degloss them. Painted them with enamel Olympic paint that I had mixed at lowes. It’s been about 4 hours worth of drying and when I began to pull the tape off and the paint basically peels off if you nic it. Any suggestions?☹️
Hmmm…. That is a bummer. I tend to think the only solution is to sand the cabinets down and start over. I don’t use liquid sander on laminate, as I’ve never had good results. I prefer to sand lightly and use a good primer. Let me know what you end up doing and how it goes. 🙂
Hi Larissa,
We are mid-makeover of our 88 sequoia and I am concerned about my paint choice. I have sanded and prepped and I am using oil based primer and rustoleum satin finished spray. Should I be using semi-gloss instead? Worried about smudges and dirt. Your thoughts?
We used satin, and I love it, Lisa. It is really a matter a preference. The satin wipes clean just as easily as semi-gloss. 😀
My wife just painted all of our cabinets, but noticed when we were installing the hardware that they were chipping very very easily. She then tried to get a protective coating for them, but it looked horrible. What should we be using to protect the paint from chipping?
What a bummer! What type of paint and primer did she use?
She used a multi-purpose primer and sealer and a latex paint.
Could you tell me what site off amazon that you got the flexible t molding
Sure! This is the trim we used, Maggie. 🙂
3/4 Smooth White T-Trim
I love this website and this post is super helpful.
We don’t have a pop up, we have an old hideous class C motor home that we are planning to remodel! So, thank you for all of your helpful posts. (And just the eye candy, let’s face It, these campers are beautiful!)
On my list: oil based paint and primer, and rustoleum for the hardware!
Has anyone fully replaced the lightweight MDF cabinets with something more durable?
Hi Larissa, the plastic film on the cabinet walls are bubbling and so are some areas on the walls. How should I prep these before painting?
I have heard from readers that simply glued the laminate back to the cabinet before painting, but I have also heard from some who have removed it completely. If you remove it completely, you’ll have some sanding and filling to do. My choice would be to glue it back in place if at all possible. 😉
I love your blog and you have done such cute and functional things!! But I have a completely non-renovation related question. What is the adorable enamel cook pots you have in the pictures?! I love them and even at home you cane never have enough smallish pots!
World Market, Leah! I haven’t actually used it yet, because it is too cute, so I’m not sure how functional it is. Lol. 😀
I was inspired by this blog to revamp our “new to us” pop up. I primed with an oil based primer and just painted the first coat of oil based paint. When I’m done, do I need to seal it? I painted it white.
We did not, Sasheen. Oil-based paint is very durable and will wipe clean easily. 🙂 Can’t wait to see pictures!
Prepping to paint a 2002 Santa Fe. How did you deal with the metal strip on the front of the galley cabinet?
PS, thanks for the blog. It’s basically the only way I was able to convince my wife to buy a pop up 🙂
We just used a spray primer for metal and spray painted it, Sam. It worked really well. Can’t wait to see how yours turns out. 🙂
Do you have a tutorial for painting the cabinets?
Sure do, Jaleesa! You can find that post here.
Did you use spray paint (primer and paint color) for all of your cabinets? We just bought our fiat pop up and also live in AZ… I’m trying to decide what type of paint is best for our climate. I have done interior cabinets before with latex, but I was considering trying out chalk paint with the wax sealer…. I hadn’t considered spray paint.
Would love your thoughts!
The spray paint has worked out fabulously for us, Kari. I would do it again (or maybe roll on an oil-based paint) if I was doing another remodel. It does well in the AZ heat. I have heard that the wax sealer can get tacky in hot temps. Maybe coat your chalk paint with a polyurethane instead?
When painting the cabinets, can I use ANY oil based paint? Does the brand matter? (As long as it’s a reputable brand?)
I like Rustoleum, Brandy, but it doesn’t have to be a specific brand. 🙂
Hi! We are looking into painting an RV and I’m wondering if people paint the inside of the cabinets? Or just the outside and have the outside and inside mismatch?
We did not paint the inside of *most* of our cabinets. We did paint one cabinet with drawers, and when the drawers slide in and out, it scrapes the paint off the inside. As a result, we usually have a fine powdery white paint on inside our dish drawer. I really wish we would have left the inside unpainted.
I wanted to paint my pop-up cabinets and the walls what brand of paint do you recommend?
You can read all about how we painted our cabinets here, Debbie. For the Rockwood we are currently remodeling, we are using a Dunn Edwards alkyd paint. I really like that as well. I think Sherwin Williams makes a comparable product.
What color green are the cabinets in your new camper? I have such a hard time finding a green I like enough to commit to in such a small space, even though its my favorite color, and I love the one you used!
Love your blog so much btw, it has so many great tips for a new camper owner. Thank you!
We actually did a post about our new cabinets here. The color is called Fresh Thyme from Dunn Edwards. 🙂
Larissa-
Love your remodels/tutorials! I had planned to remove all of my cabinets and rebuild them, but am a little chicken to do so. I am considering just paining them and redoing the counters with something like Rustoleum counter solutions. My cabinets are metal-does this affect my process at all?
Deb – I repainted my vintage metal kitchen cabinets 20 years ago, and they still look great. I sanded off about 9 coats of UGLY paint, cleaned the surface well, and used Rustoleum primer paint for metal. Then I finish-coated with Rustoleum in satin White. The kitchen cabinetry has survived two decades and kids/dogs/grandkids and looks just as pretty as it did when brand new (70+ years ago…) Use an oil-base paint for durability, sand that surface and clean it, and primer for your first coat!
My 1980 travel trailer is set on a permanent slab. I want to change out the hardware on cabinets. It’s the locking style knobs. Can I do that ?
I have seen people spray paint that locking type of hardware with good results, Susan. I’ve also seen campers who have replaced their hardware with regular cabinet drawer pulls and then added magnetic catches to the doors and frames to keep the doors closed while towing. We added doors to our dinette booth and used the magnetic catches, and they have worked really well. I don’t see why you couldn’t just use them on your doors, and you’d have so many more styles from which to choose, too. 🙂
My husband and I are renovating a 92 Jayco 806. My cabinets are made of 1×1 with really thin panelling type wood. Really thin but not ready to rebuild the cabinets because we are having to replace rotted wood in roof and on corners of the trailer. So, will primer and paint hold up well on this chintzy wood?
Without seeing it in person, it’s impossible to say for sure. Our ’95 Rockwood had similar cabinets, and although we rebuilt them from scratch, I did do some sample painting on the original cabinets to test durability and sheen. The paint had no problem sticking to those cabinets. Proper prep work is the key! Don’t skimp on sanding and primer.