


 There are a lot of readers out there who want to give their pop up campers a fresh new look without painting the cabinets. I get it. Painting is a pretty seriously commitment, and if you’ve never painted anything major before, it can be quite intimidating. That’s why I love to feature makeovers like Lisa’s. Lisa did an amazing job renovating her camper by working the oak colored cabinets into her color scheme–and the results are gorgeous. Here she is to tell you all about it.
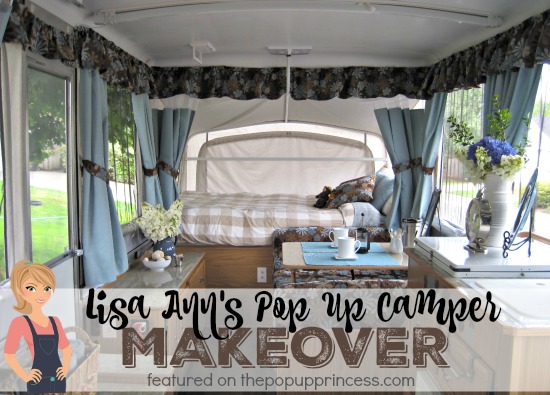
Lisa Ann’s Pop Up Camper Makeover
First, let me say that I have camped all of my life. Growing up, my parents had a giant Skamper pop up from the early 70’s that slept eight, and we took that thing everywhere. After I finished college and got my first teaching job, I bought my brother’s Coleman Cedar from him. I had to sell it when I got rid of the vehicle that I used to tow it with, but I always wanted another pop up camper.
I met my husband, got married, and moved to the Pacific Northwest, where we tent camped for a number of years. Our Honda Pilot was always so stuffed with camping gear that the dogs would no longer fit, and we would have to put a rooftop carrier on to carry all of our supplies. I inherited some money after my father’s death, and we both agreed to start looking for a used pop up. I knew that it would be something that my dad would have approved of. An older couple in our area was selling their Santa Fe, as they were upgrading to a Class C motorhome. They let us come out early to look at it before they opened it up to potential buyers, and we bought it at first sight. My main objective was to get something where the canvas and systems were in good shape and then remodel the rest, and this fit the bill. I was definitely inspired by Larissa’s Santa Fe remodel.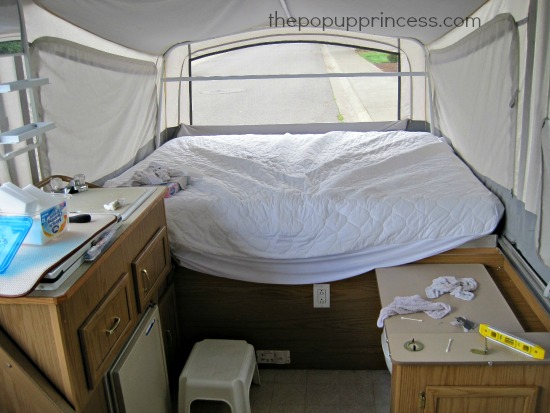
We decided not to paint the cabinets, as we have two young children ages eight and six, and two dogs. We also camp primarily in state park or Forest Service campgrounds, where there is A LOT of dirt. I didn’t want to be constantly wiping down the cabinets. Since we were going to “go with” the oak, I wanted a fabric that would coordinate with it. My husband and I stumbled across this one at Joann Fabrics – Better Homes and Gardens Manolo Mink. The tan in the fabric matched the oak perfectly, and it had my favorite seafoam colors in it. It wasn’t cheap, but I used a coupon. I bought 10 yards for the valance and dinette cushions and had a little left over to make the throw pillows. I came across clearance curtains at Lowe’s that matched perfectly and were thermal lined. I just had to hem them and attach the rings. I used Larissa’s method to attach the curtains to the original tracks.
 Even though we didn’t paint the cabinets, we still did a lot of renovations to the camper. We replaced the hardware and hinges with brushed nickel ones and replaced the drawer guides, faucet, flooring, and the water pump. We also put in a battery voltmeter with USB jacks, upgraded to all LED lighting, put in sliding baskets for storage in the cabinet, put in a drawer under one of the benches. We also replaced the zipper on the awning bag with a Handy Stitcher.
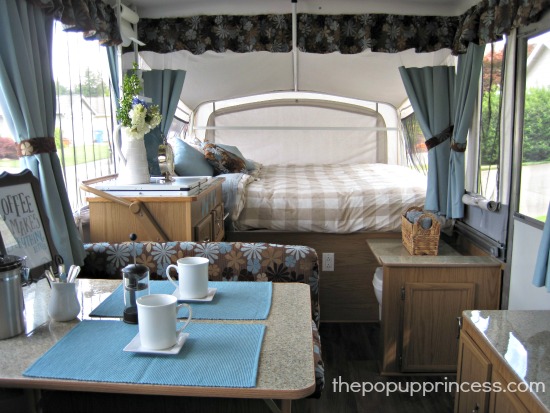
Our t-molding was coming off the countertops on the toilet lid and the small counter next to it. The previous owners had just screwed it back on. I went round and round with myself over what I was going to do to upgrade the countertops. I decided on a process similar to Larissa’s countertop project. I used plastic chips, but I wanted to bring the seafoam and teal colors into the countertops. I started looking for chips online in different colors, and I came across Epoxy-Coat.com, which offered a counter epoxy kit, but also many different chip colors. I ordered a custom blend and three extra bags of chips in various blues and greens, because I didn’t know which would look best with my fabric.
 The total with shipping came to $211. You basically mix up a two-part epoxy with coloring and roll it onto the countertops. Then you apply a heavy layer of chips, let it dry,and sand it. The final step is another clear two-part epoxy, which you pour on and spread with a squeegee. In all honesty, it was a PAIN! The epoxy dried too fast, and I couldn’t get a good final coat. I had to sand it down and buy more epoxy from the Home Depot which was $20 per kit. I know I went through at least three kits. It was also necessary to use a heat gun to pop all of the bubbles in the finish.
 If I had to do it again, I would have bought the chips from Epoxy-Coat online and used the Rustoleum kit Larissa used. It really was a nightmare. I won’t even get into the issue with the dog’s tail… 😉 but it’s done and it looks amazing! To finish it off, we purchased new oak t-molding from T-Molding.com. We went with the oak, because there was oak trim around our galley countertop, but they also have a lot of great colors.
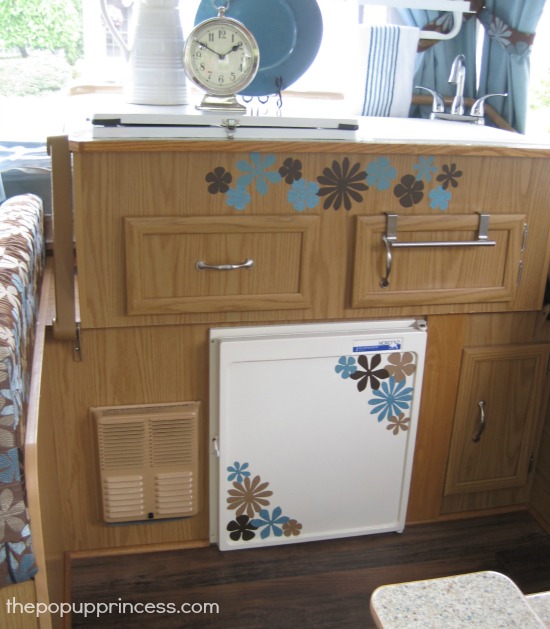
I wanted to add some visual interest to the fridge, so I painted it with appliance epoxy. Then I photocopied my fabric onto cardstock, cut out the individual flowers, and traced them onto peel and stick viny. Then I cut those out and applied them to the fridge and that awkward space above the drawer and cabinet. I love the way my camper remodel turned out, and I was definitely inspired by Larissa’s makeover and all the amazing reader features on her blog.
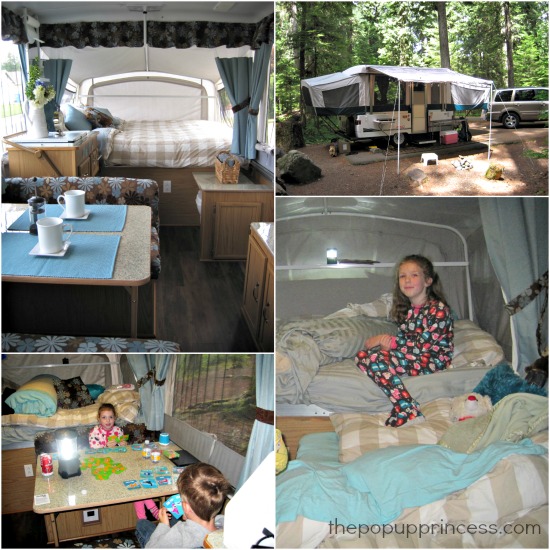 Lisa tells me she and her family have been camping often in their new little camper and having a ball. I love seeing all her pictures. We have the same camper–ours is a Santa Fe, too–and the same bedding, but our PUPs don’t look much alike apart from that. I love how a little TLC and vision can make a cookie cutter camper into something much more comfortable and personalized.
Your camper is gorgeous, Lisa. Thank you so much for sharing it with us. 🙂
Happy Camping!
![]()
Happy Camping!

I love the color scheme!
Wow!!!! I love love love your colors!!!!! I did a whole scrapbook in those colors a couple of years ago, haha of a camping trip to Tonto Natural Bridge. I think I have to go see if they have that material, it’s my favorite of all the remodels I’ve seen. You mention that your awning bag was torn and you used “handy stitcher”. what is that??? Our bag the zipper came apart and I priced having a new one sewn in and it’s expensive. Sorry your counters were a pain, but man they totally look amazing!!! Great job.
Love your makeover, especially the color scheme and those counter tops! Are those shelves by the back window of your bunks-what the lantern is sitting on in the picture with your daughter? If it is, I’d love more information about the shelves and a better picture of them if that’s possible.
Very nice job on your remodel and incorporating your canons color. I’m interested in knowing more about your awning bag repair as well. We have the same problem.
Love, love, love that you used colors that match the wood! I really don’t want to repaint and your camper just inspired me to use what I have and work with it!
I love that you didn’t paint the cabinets! Everyone’s doing it these days….nice a refreshing to see something different 🙂