


Spring is here, and that means that pop up camper season is in full swing. I’ve been getting dozens of emails about purchasing and remodeling campers, so I know it’s that time of year. Many of you are pulling your campers out of winter storage and giving them a little face-lift in preparation for camping season. I’m also hearing from a lot readers who have just purchased their first campers and are ready for all the fun to begin… readers like Jessica.
Jessica’s story is so familar. Like most of us, Jessica and her husband had been tent campers for many years. After borrowing the in-law’s pop up camper for a trip, Jessica knew they couldn’t go back to sleeping on the ground, so she started researching pop up campers. Jessica came across all the amazing makeovers on this blog, and she was hooked. She convinced her husband that a pop up camper project was just what they needed, and the hunt for a camper was on! 😀
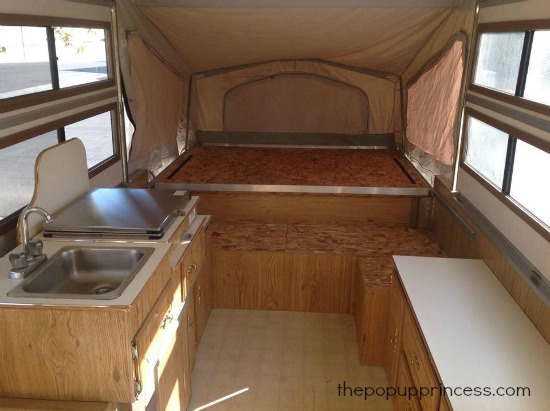
 They had two requirements… an A/C unit and a small fridge. After a little bit of searching, Jessica and her husband settled on a 1993 Palomino. The model that they purchased is a hard-sided pop up camper. It gives them a bit more insulation, which is perfect for their Nevada weather.
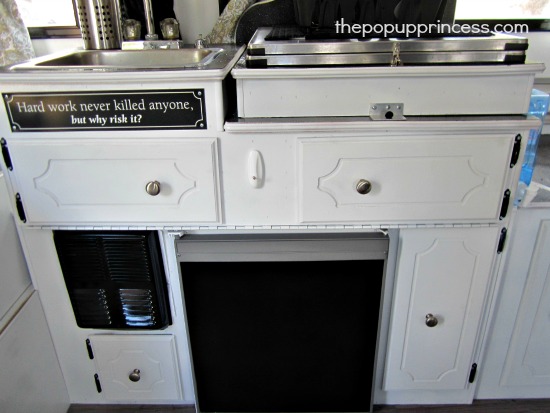
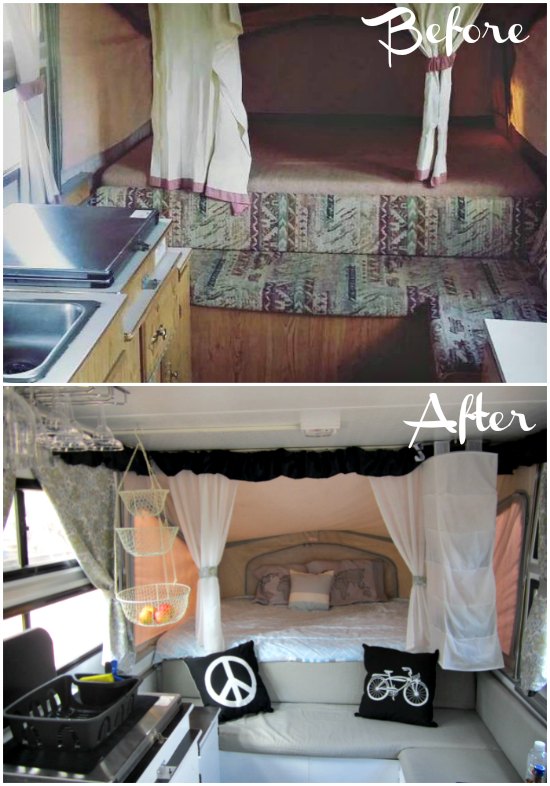
Jessica and her husband removed all the cushions, curtains, and cabinet doors and hardware to paint the inside of the camper. They decided to leave the original linoleum floor in place, as they knew they would be covering it. Jessica used a Rustoleum 2X Ultra Cover (my favorite spray paint ever! 😀 ) to give the cabinets a clean look. It took about two coats to cover the cabinets and inside of the camper.
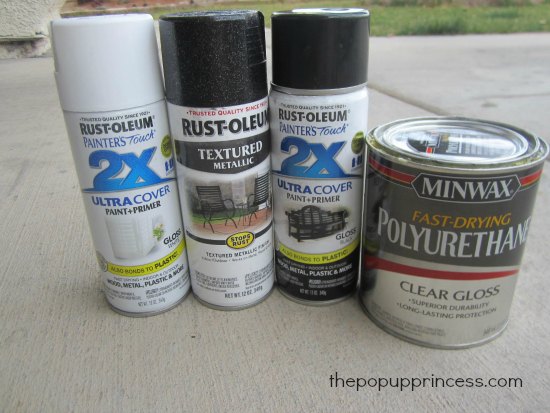
Then it was on to the counters… Jessica and her husband used a Rustoleum metallic spray paint. It had a bit of a rough texture to it, which they liked. To give it a nice, glossy look, they finished it off with two coats of polyurethane. Jessica’s husband also used a black spray paint to give things like the window frames, cabinet hinges, and heater vent new life. As the finishing touch, they added new door handles (another Walmart purchase) to give their cabinets a more modern look and feel.
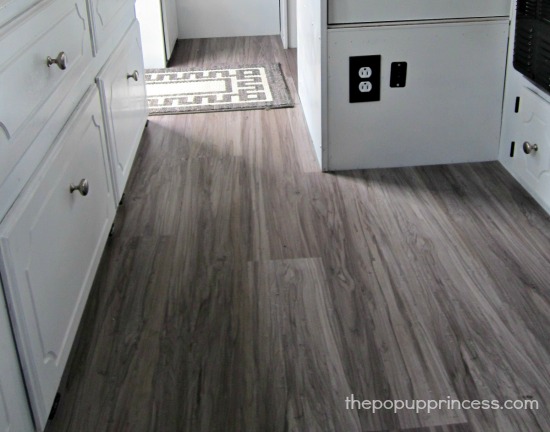
For the flooring, Jessica and her husband purchased Allure Plank GripStrip in Dove Maple. They installed it themselves quite easily, and it only took a few hours. It was much easier than they expected, and look at those results! Gorgeous! 🙂
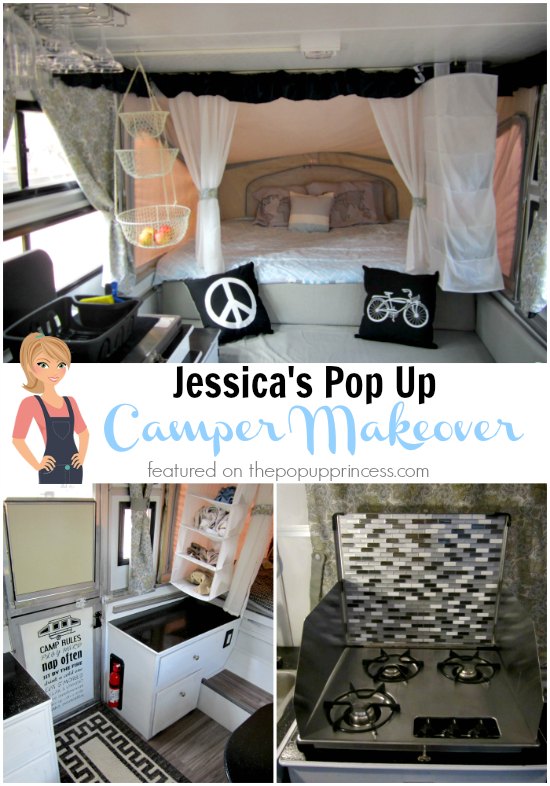
Next, Jessica removed all the cushion covers washed them well. She was able to reuse the original foam and put the newly washed covers right back on the cushions. Then she purchased 12 yards of solid upholstery weight fabric to make covers to slip right over the cushions. She also purchased a few pillow kits called Square By Design from JoAnn Fabrics. They made simple, cute throw pillows to add a little style and visual interest to the cushions.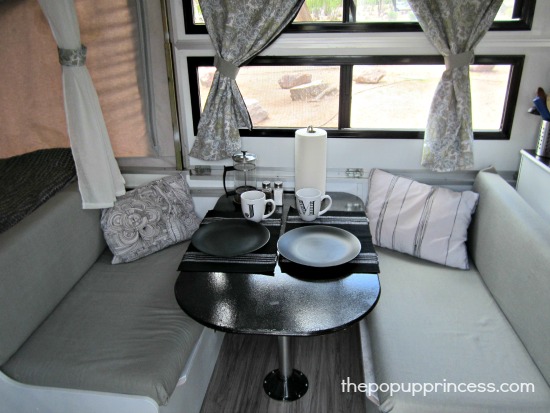
For her cute curtains, Jessica purchased inexpensive fabric from Walmart. She really wanted to add a black-out lining, but found that the material itself was outside of her budget. She purchased cheap black-out curtain panels instead, cut them to size, and used them as a lining. She simply sewed her cute fabric to the black-out panels to achieve the look she wanted. Jessica reused the original curtain hardware and sewed the plastic tabs directly to her new curtain panels. For the bunkend curtains, Jessica purchased ready-made sheers and cut them to size. Then she used lightweight curtain rods from Home Depot to hang them. Jessica embraced her small budget and shopped for her camper at the local Goodwill, 99 Cent Only Store, and Target. She picked her bedding up at Big Lots.
 I love the way they turned their camper into a little vacation home. They even added a few personal touches, like a wine glass rack from Ikea, to make it the perfect entertaining spot.

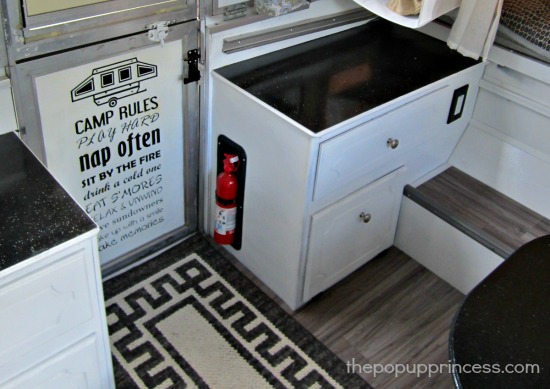
Jessica took advantage of her hard walls and hung a few signs with cute sayings around the camper. She also added a fun decal to the door.
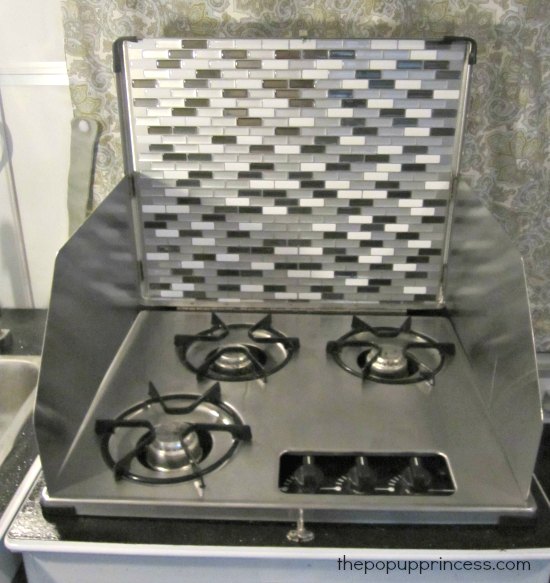
And I know you’ve been eyeing that tiled stove from the pictures above! It’s beautiful, isn’t it? Jessica used adhesive SmartTile from Home Depot to give her kitchen area that custom look. I love it! I just may have to check some of those out for my little camper! 😉
Jessica and her husband had so much fun seeing everything come together. All their hard work definitely paid off. Jessica even told me she’d do it all again if her husband was on board. I feel your pain, Jessica! I’m in the same boat, so until I wear Mr. TypeTwoFun down, I’ll just be happy looking at everyone else’s makeovers. Let’s take a look at that transformation one more time.
Amazing! Fantastic job, Jessica! I love all the personal touches. Now go make some camping memories! 🙂
Happy Camping!

Love this makeover!!! Those floors!!! We still have the plain linoleum in our camper because we can’t decide what we want to put down. But, after seeing her floors we may have found what we want!!!
I would love to know where she got the camp rules decal that she put on her camper door. I love it.
Omg! I love it!! Where did you find the Camping Rules decal for your door? Such a beautiful PUP!! 🙂
Love the tiled stove, I noticed these at Home Depot, sooo pretty!!! I might have to put this on my to do list.
looks great!
Looks great! Where did they get that awesome camp rules decal? I must find it 🙂
I also love the decal! It got my busy shopping on etsy!
Is that a modified table? If so, any links to tutorials, etc?
We are looking at those exact floors for our pop up. However, the instal video recommends them for temperature controlled environments only. Has anyone had any issues putting these floors in a camper? We are in Iowa.
That’s true, Justin. The manufacturer recommends installation in temperature controlled environments only and won’t guarantee these floors in RVs. We have not had a problem at all with our floors. I love them, and would do them again in a heartbeat. I have heard some complaints about the vinyl that is adhesive backed not sticking in warmer weather. We used the click-lock type, so I can’t comment with any real experience on the adhesive backed type. I do know that many of our readers have installed them, and I haven’t heard any complaints. If you are truly concerned about temperature and moisture, your best bet is installing sheet linoleum (like what is currently in the camper). You’ll have to take the cabinets out for that, though. 🙂
Can you post a link for these exact lock type you purchased? This is exactly what I want but I also saw the Home Depot video warning me about tempature controlled rooms and what not. There’s so many links out there. Would love to just purchase where you did
All vinyl plank flooring will warn you about temperature controlled rooms, Gloria. Technically, plank vinyl flooring is not recommended for RV applications. The manufacturers don’t want to be responsible if something happens and your floor buckles or has gaps. Many of us have had success with plank vinyl, regardless of the warnings, so that is why we use it. If you are concerned, I would recommend replacing your floor with a sheet vinyl that looks like wood planks. 🙂
I would like to know about this too, since it specically not made for camper????
Love the redo. The rules on the door is way to cute. Great job.
Love LOVE your redo! Absolutely gorgeous!! How many cans of spray paint did you go through for the white cabinets and wood throughout your camper? I’m considering using this spray paint in ours but have no idea how many to buy. Thanks for your help!
Check out Etsy for camp rules decal! Many different ones come up!
Did you just use screws to hang things from the ceiling? How is the hanging shelf secured?
Cute remake! I’d love to ask how she cleaned or covered the canvas on the inside, it looks mighty fine!
You can read all about how to clean your canvas on our post here, Ellie. 🙂