


I don’t get many makeovers submitted from the guys who read this blog. Admittedly, many of the makeovers are very girly, and most guys just aren’t into that. So when I receive photos from one of my guy readers, I get more than a little excited! 😉 That’s why I am happy to share Chris’s makeover with you all. You won’t find any fluffy comforters or pink coffee pots with this one, but you will see how Chris and his girlfriend transformed their 40-year-old vintage pop up trailer into a camper that completely fit their needs. I just love that!
About five years ago, Chris bought his first tent trailer for $300. He loved camping in it, but it had seen better days. He eventually had to sell it, but he always knew in the back of his mind, he’d get another pop up camper. Chris had a good friend who picked up a 1980 Bonair camper last summer, and after camping in it all season long, he knew it was finally time to get another pop up camper.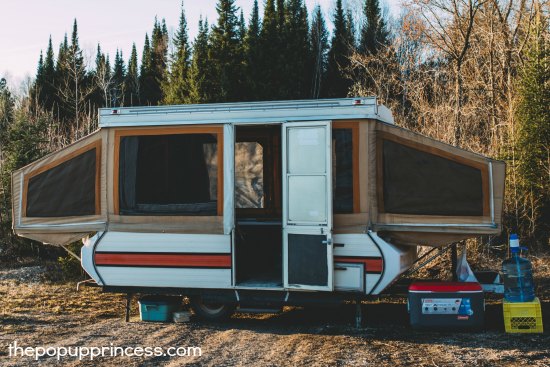 Chris and his girlfriend, Natalie, picked up this 1976 Bonair 1150 for $1000. They loved the spacious interior, and were thrilled with the condition it was in, considering it’s age. Natalie convinced Chris to get a Pinterest account, and they came across this blog. It wasn’t long before they were planning a remodel of their own.
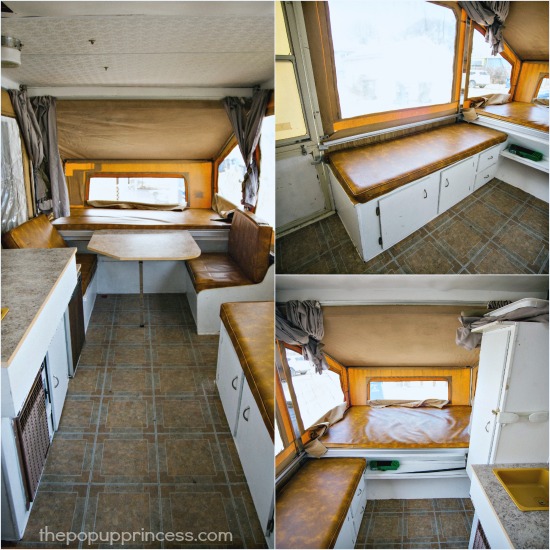
The previous owners tried to cover up the dated cabinets with a coat of primer, but it didn’t seem as though they cared much about the end result. Those cabinets were in desperate need of a new paint job. After a few arguments about what color would best coordinate with the orange-hued canvas, Chris and Natalie settled on a darker grey paint. They bought two pints of paint, and it was just enough to give all the cabinets three good coats.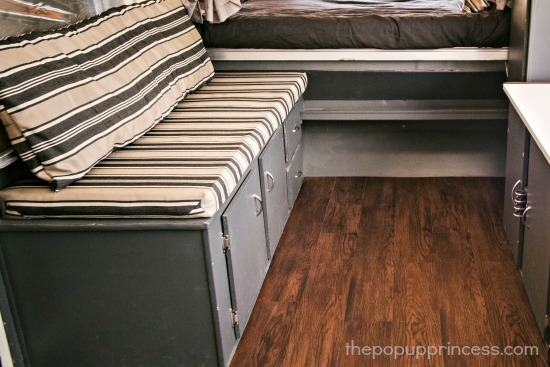
Chris went down to the local Habitat for Humanity ReStore and picked up two boxes of floating vinyl resilient grip strip flooring for $30 each. He took out the original table, because it seemed way too big and awkward for the space. Chris cut a smaller vinyl-wrapped piece of wood from ReStore to the proper size and remounted the table hardware to it. It fits the space much better but can still be used to turn the dinette area into another bed.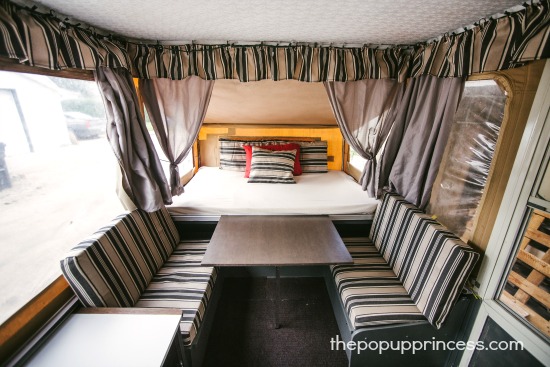
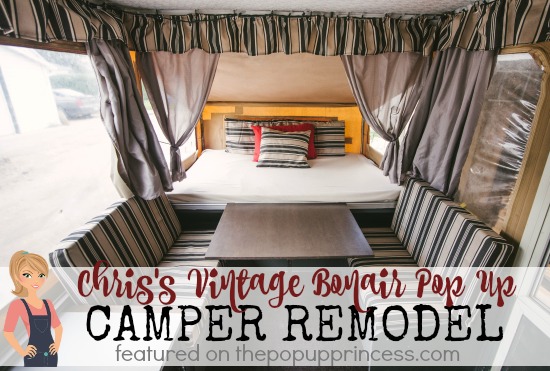
Chris and Natalie went down to Fabricland and looked in the discount section for about three hours until they finally found something that would match their new grey paint and the existing beige canvas. The material was thicker and more canvas-like than they originally wanted, but in the end, they were really pleased with the results. Natalie sewed the slipcovers to go over the cushions and had just enough material left to do the valance. They made the length of the valance about 15 feet longer than the total length of the roof and threaded a string through the top to gather it. They attached grommets to the valance and used zip-ties to hang the valance on the camper. They also threaded string Christmas lights along the valance for extra lighting, and wired them to a switch so they could easily turn them on and off.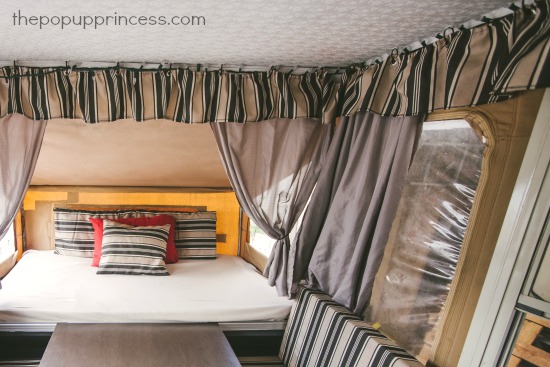
Chris and Natalie weren’t fans of the fold up counter with the sink, so they decided to remove it. They went to Home Depot and found a pre-made counter to replace it. They added a few trim pieces to frame it out. They removed all the unwanted electrical wiring, the fridge and the furnace, along with all the hardware and plumbing that went with it. They bought another cabinet door from ReStore, which covered the furnace opening perfectly.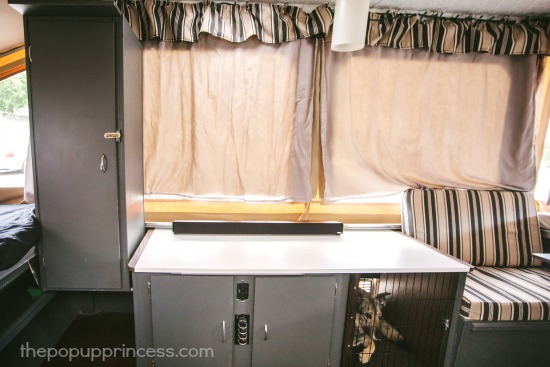
They decided to use the empty space left from the fridge to make a little home for their dog. At the Salvation Army, Chris found a folding clothes rack, which he used to construct a kennel door. After their first weekend camping with the new camper, Chris also decided to put down a carpet from the door to just under the table. They had noticed quite a few scrapes from rocks being carried in, and the carpet was just the thing to help protect their new floors. Chris found the carpet at Walmart for about $30 on sale and says the rubber bottom really helps it stick to the vinyl flooring.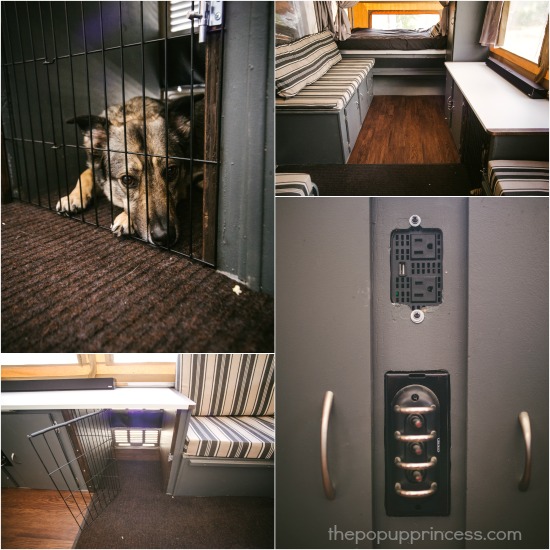
Chris added a deep cycle battery, two 400 watt inverters, and a 400 amp Noco Genius smart charger, which he mounted under one of the seats. Chris and Natalie do a lot of “off-the-grid” camping, and needed a way to have continuous power. They can run off their battery when they are dry camping, and can come back, plug in, and recharge to a full charge in about 30 hours. They mounted one of the inverters inside the side access door, so they could plug in their Christmas lights and other outdoor amenities. The other inverter was mounted inside a cabinet where the old original outlet was mounted. This way, they could also charge phones, cameras, and accessories.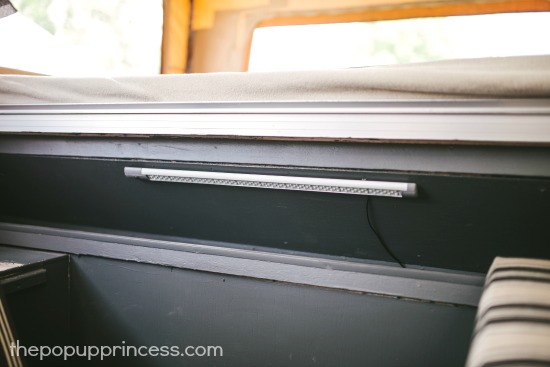
Chris also mounted strip lighting in several places around the ends of the camper to illuminate the bench storage and cupboards at night. They wired up switches to control those strip lights, the overhead pendant light, and their indoor and outdoor string lights.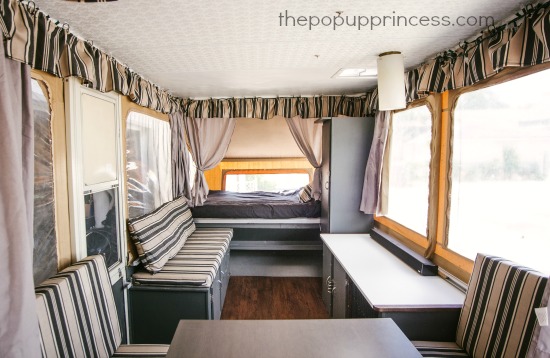 Isn’t that awesome? Chris and Natalie now have a totally custom–and fashionably vintage–place to call their home away from home. It perfectly suits their needs and was done on a budget–no need for an extravagant RV payment. Nice work, Chris and Natalie!
I hope Chris’s makeover inspires more of our guy readers to share their modifications and remodels. 😀 And if you are looking for a few more inspiring masculine makeovers, be sure to check out Robert’s Remodel here and Todd’s Makeover here. They are both nothing short of amazing.
Happy Camping!

Way to go! I love the little nook for your dog! Job well done.
The finished product is Amazing! What a wonderful solution for the puppy! We are about to embark on a pop up adventure with our two, 4-legged friends and this has given me some great ideas.
NICE JOB! I really like the stripes, fashionable without being feminine! 😀
Love the lighting ideas!
I like the idea of the grey cupboards. Most of the other remodels were done in white or off whites.
I would have thought the whites would attract the bugs more. I love your makeover!!
It would be so helpful if there were step by step instructions on how to remodel it completely.
I’m not familiar with wood working/remodelling.
Anyone know where to start?
Every camper is different, Jenn. Each model has a different layout and weight rating, so it is hard to layout a step by step tutorial. We took our cabinets apart, and then we rebuilt anything that needed it by using the old cabinetry as a template. You can read all about our camper remodel here. We started by removing everything and labeling it, so it would be easy to put back together. I wrote about the demolition here. It was a bit like putting together a puzzle. We’ve got a bit of experience with power tools under our belts, though. If your cabinets are in good condition, they may not need to be rebuilt, which makes the remodel easier. Unfortunately, if your cabinets need some work, you’ll need a little bit of experience with woodworking tools to tackle your camper remodel. Camper walls are never completely square, and if you aren’t familiar with building furniture at all, it can be a frustrating process to try to rebuilt your camper as a first time project. Do you already own a pop up camper?
Chris and Nathalie’s camper looks like same layout as what I’m working on. The ceiling is now black to take away from 40+ years of damage. Canvas is beige and cabinets just painted white. Fabric will probably end up camouflage. Our house duvet is camo. It is a win/ win for the hubby. Now to finish and pull it off.